A bash function to put in .bashrc so i can ask questions like
[15:24:28 148] dell0039: gpt ‘what is in a name?’
As an AI language model, I do not have personal beliefs or opinions. However, the phrase “what’s in a name?” is a famous quote from Shakespeare’s play Romeo and Juliet. In the play, Juliet argues that a name is just a label and should not affect one’s feelings or actions towards a person. The phrase has since been used to suggest that a name is not necessarily an accurate representation of a person’s qualities or character
From time to time I need some code that is only applicable to a certain version of Yocto. Each Yocto release updates the DISTRO_VERSION variable so we can use that to track poky upgrades in our layer. This is useful because often the Yocto poky distribution is updated independently of other layers.
Imagine a bug fix on newer upstream version that you don’t want to back port to your local poky. Instead, you want to overwrite that code or variable in your own independent layer. To do that you need a bit of python code. Let’s imagine you have want to change ERROR_QA specifically for poky DISTRO_VERSION=4.0.1:
# local.conf
python() {
  # Check if we have the correct DISTRO_VERSION and send a fatal error if we do not.
  if d.getVar("DISTRO_VERSION") != "4.0.1":
    bb.fatal(f"Change of ERROR_QA is not validated for {d.getVar('DISTRO_VERSION')}")

  # set ERROR_QA to a specia value only if Poky is at our desired version
  d.setVar("ERROR_QA", "dev-so")
}
The above code will generate a fatal error if the DISTRO_VERSION is different than what we originally intended. The fatal error makes sure you will need to either remove the workaround or fix it again.
This also works to override entire functions, on your layer, as long as the function name and signature matches.
A common task when using Yocto is to create multiple Linux images for a single target’s load. A very simple example is an emergency partition for fallback.
The easiest way is to go to your image recipe and add:
In plain English, this means the task do_rootfs now depends on my-other-image recipe’s image_complete task. All images that inherit the image.bbclass will have the do_rootfs and do_image_complete task, so it is safe for you to depend on it.
Now every time you build your main imageyou also build “my-other-image“.
PS: A kind of top-level “meta” image recipe could be created that installs nothing and just depends on images so that IMAGE_CMD or wic takes the images and generates a target readable blob. Maybe one day I will post an example of such a recipe.
PSS: If your are thinking of fallback do not invent the wheel and have a look at RAUC.
I recently tried to update my laptop’s Linux installation from the BIOS Compatibility Mode to UEFI. I wanted to do it so I could update the laptop’s firmware with the UEFI capsule system and fwupdmgr(cool system by the way). Little did I know i was in for a ride.
The process is quite complicated to do manually and is especially sensitive as doing it incorrectly will destroy my data. Restoring a whole disk backup takes a huge amount of time so it is best to avoid it.
Start Boot-Repair, click on “Advanced options”, go to the “GRUB location” tab.
If you do not see a “Separate /boot/efi partition” line, this means that your PC does not have any UEFI partition. In this case, exit Boot-Repair, then create an UEFI partition (see the “Creating an UEFI partition” paragraph above).
If you see a “Separate /boot/efi partition” line, tick it then click the “Apply” button.
I assumed Boot-Repair could do it’s job while the system was up. I did not have much faith in this assumption but believed boot-repair could add some entry to grub, and load a special initramfs which would do the magic. Unfortunately it did not have such abilities. Fortunately, it was upfront about it and gave a suggestion to run the software in a live CD, as in the message below:
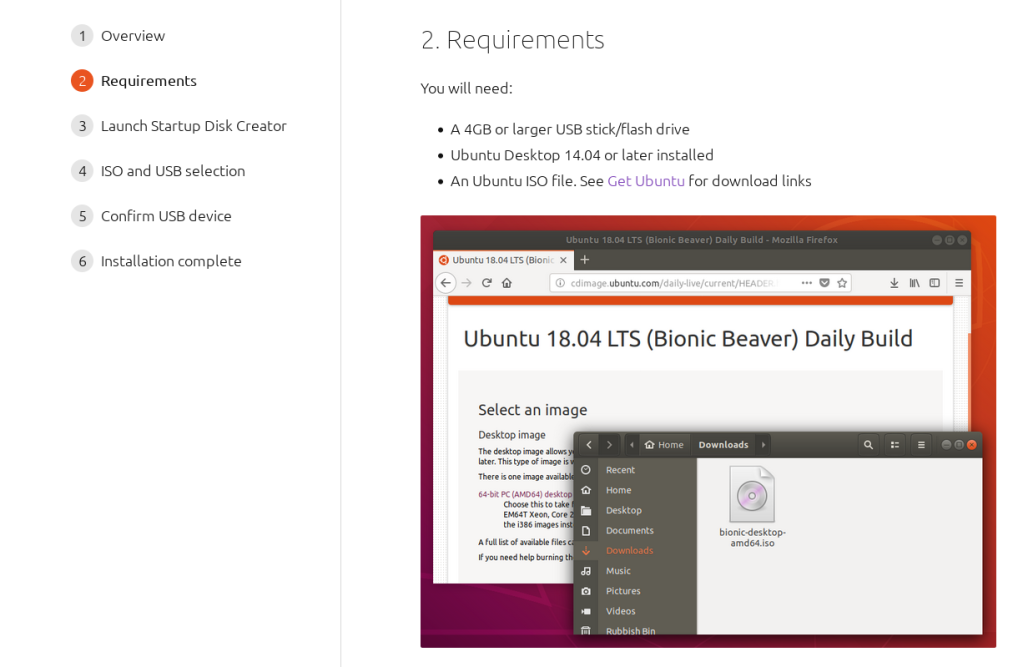
I proceeded to try to download the latest Ubuntu livecd ISO from Canonical. Kagi(my search engine) did not return the immediate link, but neither did google. The first hit from Canonical is a tutorial that has no direct link to download the ISO. Instead it has links for how to prepare live usb drive for a multitude of operating systems like in the picture below.
It was disappointing as I needed to read the whole text to get an idea of how to proceed to get the ISO. So I clicked on “Create a bootable USB stick for Ubuntu“…and I get another tutorial!
Notice that again this is a “web app” style dialog where I need to click on the right step to get to the actual live cd download link. I know this is an attempt at being friendly but this removed the ability to just scroll the information naturally. It also removes the ability to search on the whole page, in browser as well as on the search engine. Can you find what is the “page” that contains the link to get Ubuntu? By searching for ISO I hit “ISO and USB selection” as in the picture, but going that road did not lead me to the ISO. It took me 3 page navigations attempts to guess it is in page 2 (Requirements):
Eventually I found the liveusb ISO . This is where the step by step instructions actually go the extra mile of promoting the “Make Startup Disk” tool which simplifies the process of making a live USB disk. Without the extra help I would have just used unetbootlin or even better just run dd into the USB device, but that would be the hard way and I wanted to stick to the beaten path. The above mentioned issues in finding the ISO are a nuisance even so. The ride will start further down.
Armed with my USB Live Ubuntu disk I prepared my computer to boot it instead of my normal disk. I booted it in BIOS compatibility mode and it booted up normally into Ubuntu.
If you followed the community link for boot-repair you might have noticed that it is not part of the included livecd‘s software nor even Canonical’s repositories. This means that the internet needs to be configured and the external repository added. To add the repositories it is something simple like:
With boot-repair installed I tried again to run it with the instructions mentioned in the community help page. This time though it failed because it could convert to UEFI Grub while in BIOS mode. I do not have the screenshot but it is similar to the error modal shown above with different text. It was fair that I needed to be in UEFI mode to convert to it. Maybe some validation or efivars.
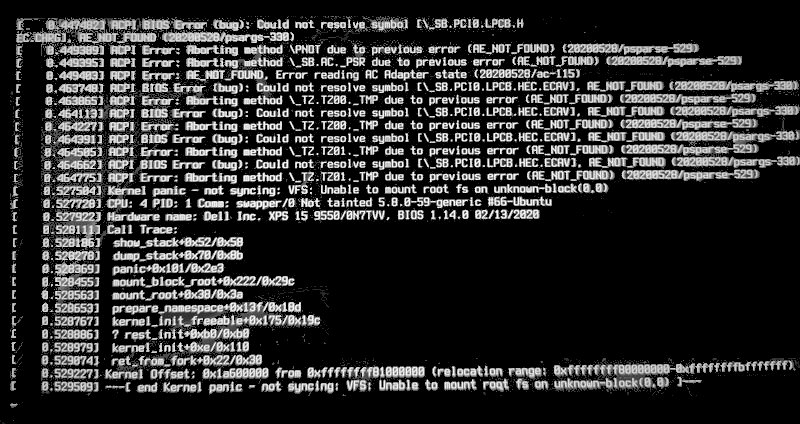
Restarting the computer I go to my BIOS menu and configure the boot mode to use UEFI and the LiveUSB disk. And…it panics! As found in askubuntu the error is the following:
I pity the poor intrepid Linux newbie that tries to run the latest(April/2022) Ubuntu live CD. I am an expert Linux user and professional and this error is horrifying. How was it possible that the kernel cannot mount root? Unknown-block(0,0) is the USB disk identifier provided by Grub(The live USB bootloader). If I did not remove the USB drive then something else must have occurred. Let’s analyze what else did it show?
ACPI errors. Spoiler, they are all irrelevant, further drowning the hypothetical newbie in issues.
There was only one possibility left. This was a ramdisk and we got out of memory. There is a bug report of such an issue here, and the report indicates it is due to the 4K screen requiring a too a big console frame buffer at that point of system boot up. One of the manifestations of this too-big-framebuffer is that grub interaction is very slow with a noticeable delay between user input and it’s presentation. I had this delay issue in grub for ages in my regular Ubuntu installation and never thought this was due to grub choosing the maximum resolution reported by videoinfo. Given the existing reports that high resolution displays of grub console are rendered extremely small in 4K screens I do not know why Canonical does not hard-set a safe maximum resolution that grub can run at. This would solve the issues with input delay, framebuffer out-of-memory, and terrible accessibility.
With this knowledge I then tried to change the live USB disk grub resolution myself.
To set a specific resolution on grub one needs to change gfxmode. gfxmode sets the resolution used on the ‘gfxterm’ graphical terminal.
To change gfxmode in grub there are plenty of accurate tutorials around. It goes something like this:
Coming back to the livecd issue, one might scratch the head and come up with the question “How do i update grub settings of an ISO?”. The issue is that as one reads about the ISO file format, one finds that it is a read-only format and any change will require specialized software. That is way outside the scope of what we originally proposed ourselves to do: Boot a live disk in UEFI to install this magical program called boot-repair. In frustration i tried the command below just to confirm that it is indeed a read only file system and any changes to grub configuration were not easily done:
sudo mount -o remount,rw /media/pneves/Ubuntu\ 20.04.4\ LTS\ amd64/
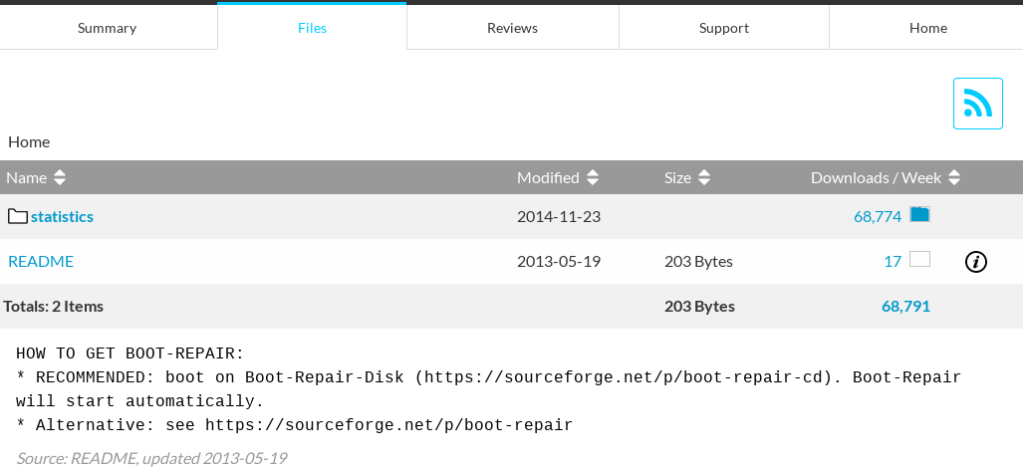
Being in a dead end, I started my typical random walk around the topic. It is a very pedagogical activity but takes a lot of time. In this random walk i started to think that maybe I can do the magic of boot-repair by myself, so I go to it’s project page to try to peek at the the source code. And… There is none(Concerning I know!). This is what can be found:
The README is very old, 2014, but very helpful regarding our problem. It recommends the download of a Repair CD that includes boot-repair. This means no need to configure the internet nor extra Ubuntu repositories while on the live disk. It worked flawlessly!
There is not much more to say about it. The LiveDisk and boot-repair executions were as easy and without surprises as possible. The OS looks like an old version of Fedora but it does the job. With the conversion of MBR/DOS partition to GPT and UEFI done, the Dell XPS15 9550 recognized my main disk as an UEFI system and I was ready for my UEFI capsule upgrade.
Basically the Repair CD did what I would expect Canonical’s Ubuntu LIve Disk to do. Extra points for the link being in an simple and old README file.
Today i was needing the correct journalctl incantation to get the logs exclusively from the last systemd service execution. It seems that Google is not what it used to be, and did not infer from my Google profile that I likely was looking for technical computer information not “Botched Executions” and death penalty. Oh well here is a screen shot from the results 🙂
PS: For the actual solution it is quite more complicated than I desired. From serverfault.com it seems one needs to get the last InvocationID and then pass it to journalctl. So much hassle.
journalctl _SYSTEMD_INVOCATION_ID=$(systemctl show -p InvocationID --value my.service)
This post is a small reminder on how to use the gdb-multiarch on my Ubuntu machine to debug coredumps from other arches/machines. I need to write it because the information I found in the internet does not always lead to the whole stack trace being available even when all the symbols and external sysroot is available.
One of the suggestions is to use:
$ gdb-multiarch -e <cross-executable> -c<core>

[...]License[...]
[New LWP 5246]

warning: `/lib/libgcc_s.so.1': Shared library architecture i386:x86-64 is not compatible with target architecture armv7.

warning: .dynamic section for "/lib/libgcc_s.so.1" is not at the expected address (wrong library or version mismatch?)

warning: Could not load shared library symbols for 11 libraries, e.g. /lib/libpthread.so.0.
Use the "info sharedlibrary" command to see the complete listing.
Do you need "set solib-search-path" or "set sysroot"?
Core was generated by `/usr/bin/fluent-bit --config=/etc/fluent-bit/fluent-bit.conf'.
Program terminated with signal SIGABRT, Aborted.
#0  0xac9d10a6 in ?? ()
As can be seen it is pretty useless and gdb-multiarch gets confused. Unfortunately without running set sysroot <path to sysroot>, gdb will be unable to get a whole stacktrace. But it is worse. Even if you set the sysroot properly, it will not for some reason reload the debug symbols for the cross–executable. Instead it will only load for the shared libraries, which is often quite useless and leaves the backtrace like the following:
# continuation of the previous session
(gdb) set sysroot /tmp/tmp/my-root/
Reading symbols from /tmp/tmp/my-root/lib/libpthread.so.0...
Reading symbols from /tmp/tmp/my-root/lib/.debug/libpthread-2.31.so...
[Thread debugging using libthread_db enabled]
Using host libthread_db library "/lib/x86_64-linux-gnu/libthread_db.so.1".
Reading symbols from /tmp/tmp/my-root/lib/libm.so.6...
Reading symbols from /tmp/tmp/my-root/lib/.debug/libm-2.31.so...
[...]
(gdb) bt
#0  __libc_do_syscall () at libc-do-syscall.S:49
#1  0xac9df676 in __libc_signal_restore_set (set=0xbeea6d78) at ../sysdeps/unix/sysv/linux/internal-signals.h:86
#2  __GI_raise (sig=sig@entry=6) at ../sysdeps/unix/sysv/linux/raise.c:48
#3  0xac9d0be2 in __GI_abort () at abort.c:79
#4  0x0750a49e in ?? ()
Backtrace stopped: previous frame identical to this frame (corrupt stack?)
Pretty useless as well, and even misleading.
The correct way to do it is:
gdb-multiarch <cross-executable>
(gdb) set sysroot <path to rootfs+debugsymbols>
(gdb) core <path to core>
[...]propper backtracke shows[...]
Only then will the whole stack trace be available.
PS: Often gdb will only show the stack trace of the thread that crashed by default, but there might be more threads worth inspecting. To show the stack trace of all the threads just do the following in gdb:
This is a post to remind myself why raucextract fails with a strange error message: “Not enough substeps: check_bundle” as also described in this github issue. The error is really not useful and it comes up if the –keyring=path is not an absolute path. Even ~/<path> will trigger that error and message. As the cherry on the top it core dumps on exit.
This issue has since been fixed but Ubuntu 20.04 contains rauc 1.2 which has this issue.
(The original article had typos because Grammarly did not work correctly and disabled my browser’s dictionary. My apologies.)
Yocto is great to build customized Linux distributions from source code. It is a very complex tool and needs to build a huge variety of software projects from source code. It often happens that a Linux distribution image needs to be configured differently when building for a developer version vs for production. Often the production version is built in an automated way through a CI(continuous integration) server. This workflow gap between production and developer has been a major driver of developer dissatisfaction. I am going to talk about my insights on what are the parts and drivers of this dissatisfaction but also provide some hints on what works, from my experience.
The usual scenario triggering conflicts is: “It works on my machine but the verification step in the CI fails“. Such a usual scenario can have multiple origins:
Build time:
The developer is building with different configurations than the CI
A given recipe produces different package contents every time it is built
Run time:
A program has inherent non deterministic behavior, even with the same exact binary. A garden variety bug
The verification step is broken
Divergent configurations at build time
This situation is mostly unavoidable in the real world. The most common reason for different configurations are:
Debug symbols
Debug tools
Builds with debug flags enabled
Secrets or security only enabled in production
Debug symbols
Debug symbol’s existence is mostly benign and rarely leads to technical issues. Even so, it can result in:
Intellectual property leakage. This is not relevant from the point of product operation but can have devastating legal and business impacts
Too large images. Some embedded devices do not have sufficient space. Insufficient space can manifest boot failures which are hard to explain and very hard to debug, due to bootloader or flash physical constraints.
Debug tools
Images with debug tools are also pretty common. Unless the debug tools are part of a critical function they also very rarely lead to verification issues. They deserve consideration though, as they can affect Key Performance Indicators(KPIs) of the development, deployment, and physical device unit cost.
The main issues associated with including debug tools vs not, can be summarized as:
Excessively long build times. The more tools you put in your image the more recipes and associated packages need to be built and installed. Iteration speed can come to a crawl
Very hard real-world diagnostics due to lack of tools/APIs. This is specially true in embedded devices due to their one-purpose nature enforced by cryptographically verified read-only flash. This means that a developer needs to completely regenerate a new image with the diagnostic tools required
Increased security risks due to bigger system tampering surface
Increased costs due to redundant storage. In volume, extra storage can lead to massive expenses
Builds with debug flags enabled
Debug build flags can significantly impact system and application behavior that result in side effects like the stereotypical “but it works on my machine”:
Increased logging and diagnostics has a quality of changing concurrent execution dynamics, often masking issues in concurrent code that are only visible in production
Release functionality being dependent on diagnostic flags, which in turn bring unvetted and untested states. Such unvetted situations can disable or bypass security features
Different optimization levels exposing or hiding latent bugs result in verification vs developer mismatch
This situation is the most damaging from the organizational point of view. In the end, the software is done by people and the feeling that testing is unreliable may lead to the following negative outcomes:
QA team vs Dev vs Customer support blame games, leading to increased bug fix turnaround
Decreased morale in the developer team due to belief the system is rigged against their productivity
Decreased confidence QA team is doing it’s job correctly and that quality checks are meaningful
Secrets only known in production
Generally, the mismatch of secrets in developer and release builds does not result in issues although I had the misfortune of having a situation where it impacted me: In development, it is normal for security systems to be disabled. Unfortunately in production, the addition of an actual key to some bootloader security internals led to a buffer overflow that was very luckily detected on time. My changes were in a completely unrelated part so I did not even know I would trigger it.
Divergent behavior at run time
The following is not necessarily Yocto specific and is valid for software engineering in general.
Normal bugs visible only at release
Often it is hard to know if a given behavior seen for the first time in a production release is due to the different configurations used for release, or if it is just bad luck it became evident in the release. The following lessons I learned:
A bug’s manifestation is not the end. Fixing the bug is.
The identification of the bug often starts with analyzing the manifestation which can be made difficult by the lack of knowledge of what triggers the bug. This is where development/release mismatch adds another layer of uncertainty and effort.
Incorrect verification/test steps
This one, highlights the old “who tests the tests?” question. My experience is no one, unless:
They fail to catch a bug
They fail when they should succeed
They fail in the release verification flow and succeed in the developer’s flow. The contrary is also true.
I am going to only write about the last point where a flow mismatch leads to different test and verification outcomes.
There should be a single command where all the setup, building, and testing is done owning the solutions to all mismatches between developer and release/CI. This has 2 reasons:
A single command means there is a technically enforced agreement and connection between release owners and developers.
There is only one way to run verification.
In the real world, it happens that a whole verification flow would be too time-consuming for developers but this fact is already providing insights and venues for improvement:
The single verification command logic could be smart enough to detect what tests are required. For example there is no need to build any software if only the testing repository changed
Logical steps of the whole verification flows are visible both on the CI dashboard as well as callable locally.
A tool where the whole organization can give feedback:
The release team giving feedback on verification gaps or reliability
The developer team giving feedback on improved modularization
Final notes
This topic became quite bigger than initially intended. It was also a much broader topic than what I wanted to write about, so if something is confusing or you have suggestions let me know as I would like to improve.
Also, my experience is mostly in embedded-devices but I have a feeling that most of it is relevant to other areas of software engineering. It was also not easy to write as it collects many disconnected experiences I had over my career and projects.
I try hard to make my integration tests run in docker containers to guarantee they are not mistakenly dependent on my system and that they test the system as if a real deployment was in place.
Sometimes a test depends on some startup string existing in the logs. An example is that my server emits an administrator temporary password for the first time the server runs. This one-time administrator password is written to stdout and docker logs <container> captures it. Unfortunately for my testing setup, when the container is destroyed and re-setup the logs are reset losing that one-time password needed by the tests. That destroy/re-setup cycle is often manual and not part of the expected flow but it happens frequently due to manual tunings.
I used to just hardcode the temporary password on the tests for when manual iteration was ongoing but this was annoying because I needed to be careful to not commit the temporary change, and because it always meant I always needed to carry over a diff with such workaround. That temporary password would actually be meaningless if it was committed and would break automated actual testing. Instead of changing code with the drawbacks above, I found a way to manually write the temporary password back to the docker logs.
The docker logs --follow command will continue streaming the new output from the container’s STDOUT and STDERR.
PS: I could not find a primary source documenting that PID = 1 is the default PID for a newly spawned container. Given the meaning of PID=1 in Linux it is baffling or I am making a very wrong assumption.